My Pantry: A Black Hole of a Mess

There comes a season for all things and Spring has somehow been named the season to clean. Too bad for Spring. Instead of fun, its claim to fame is work.Overloaded pantry

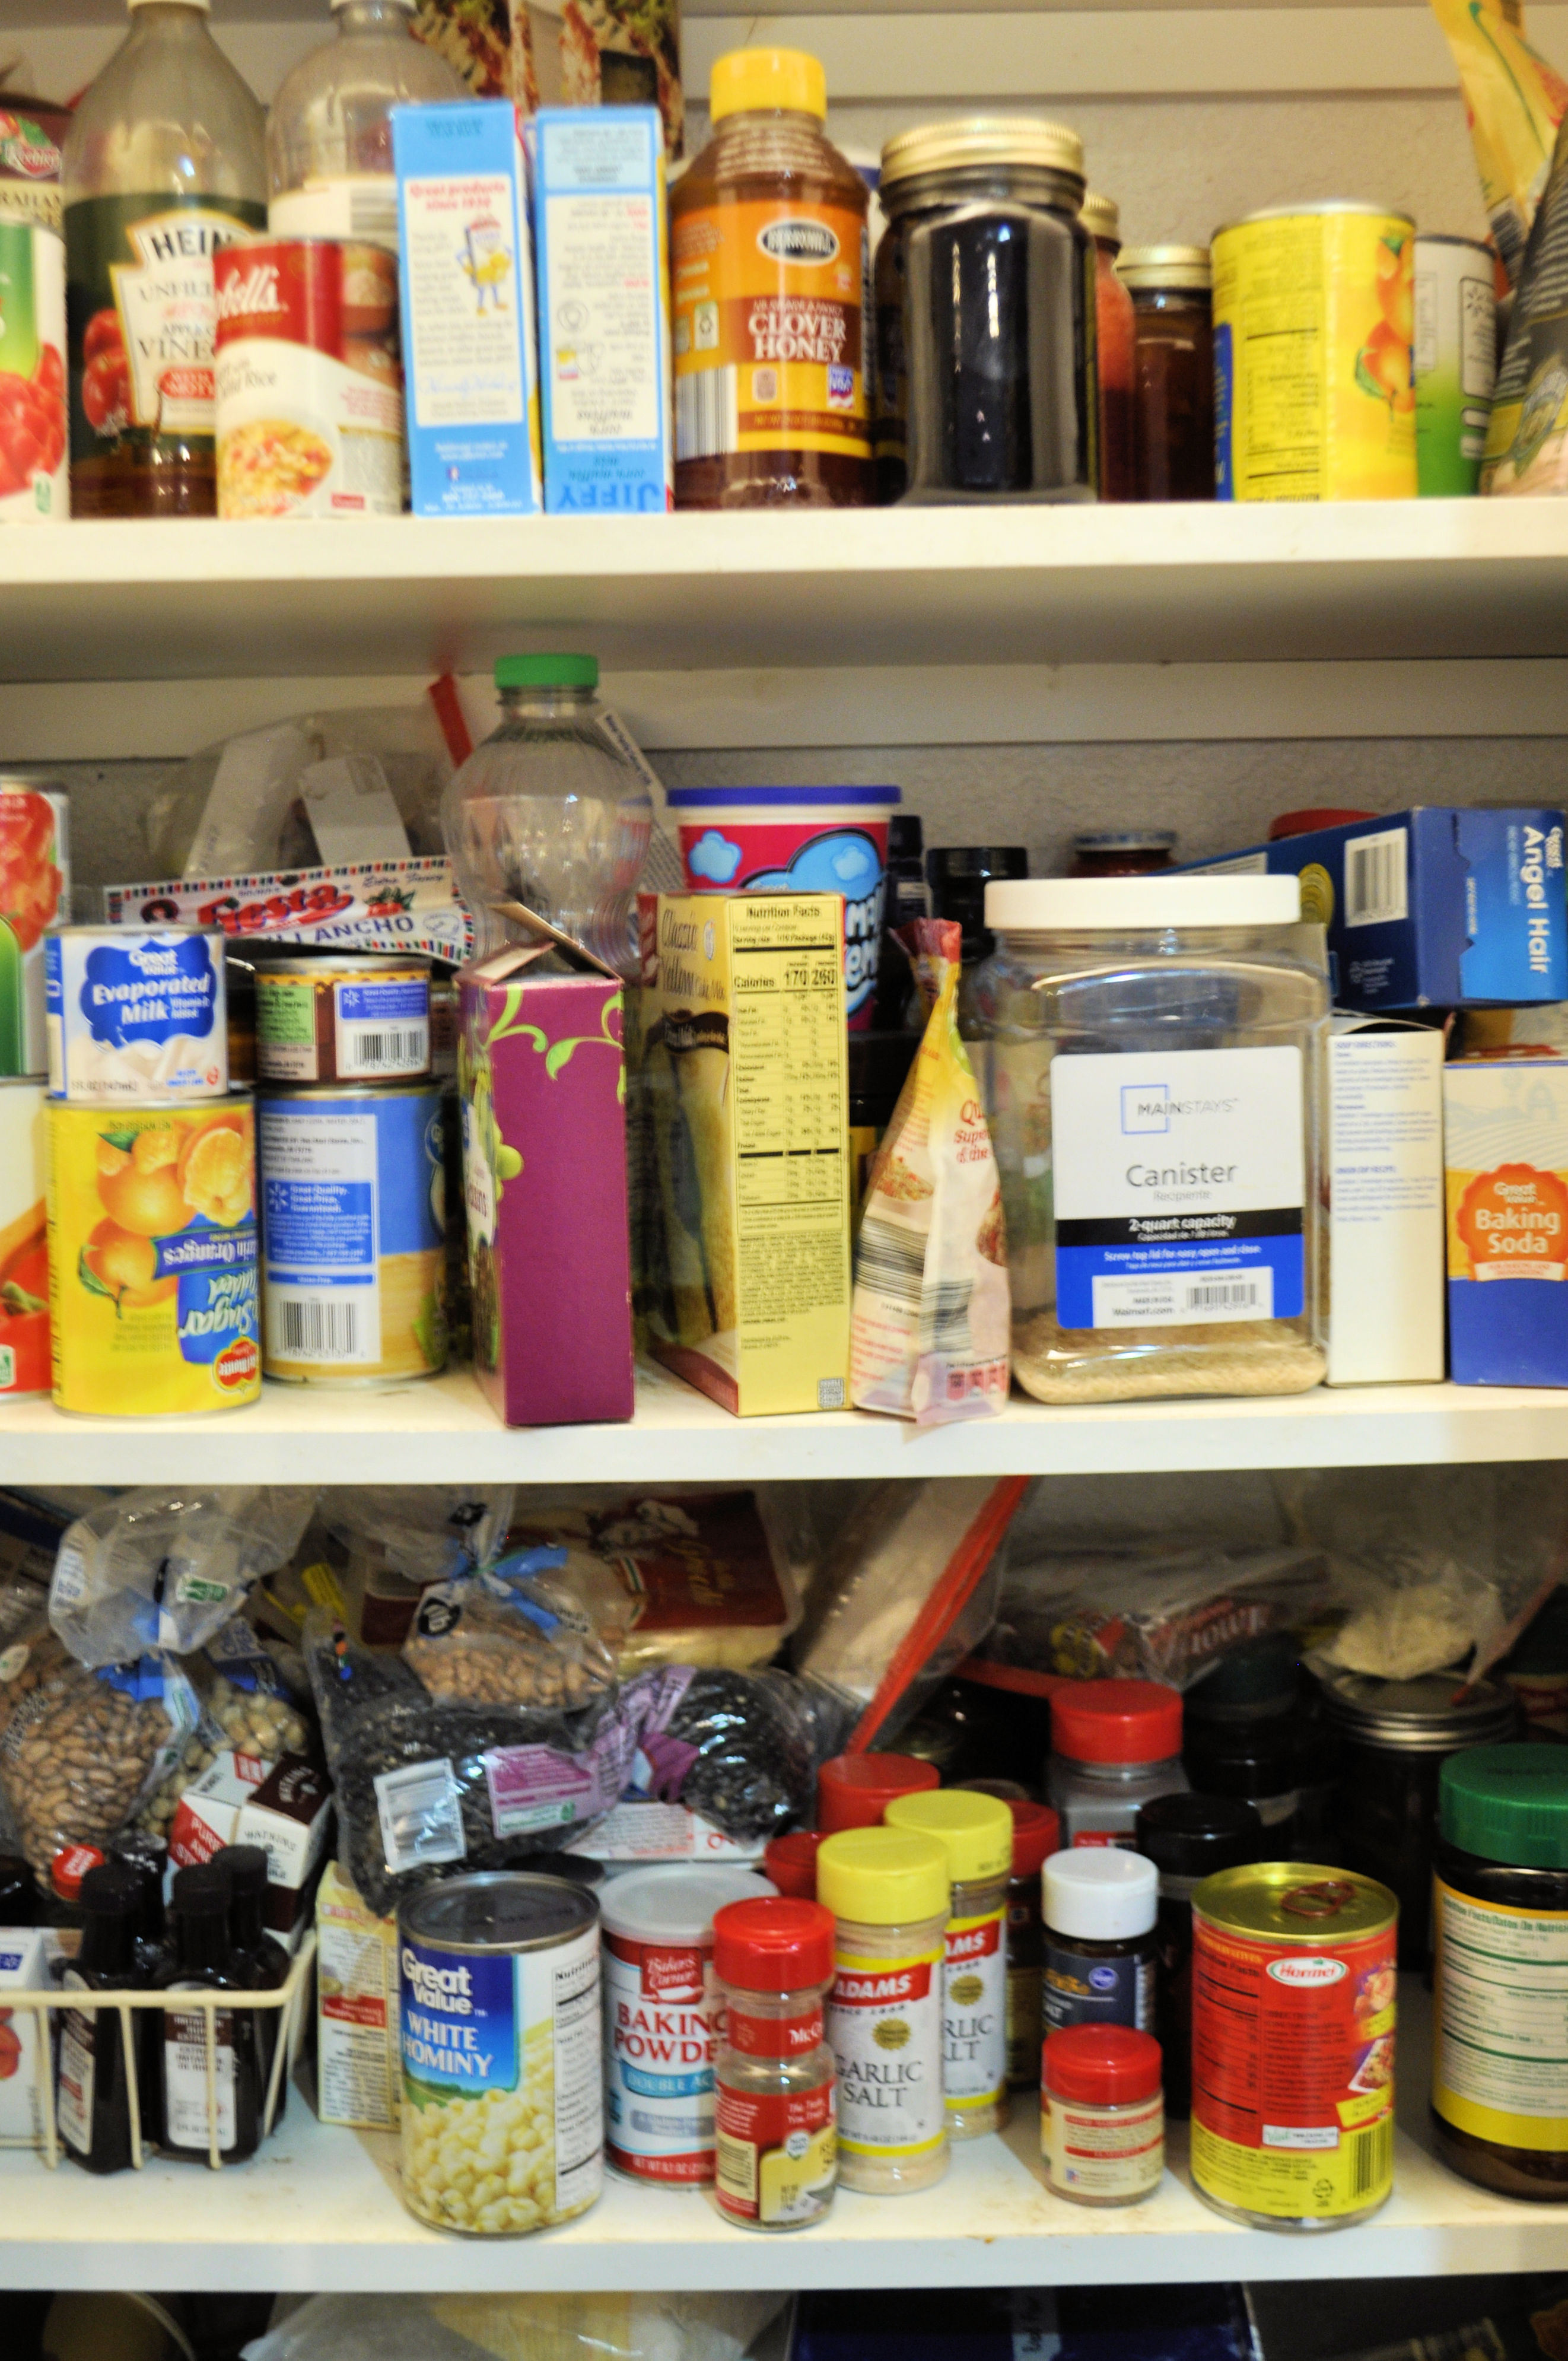
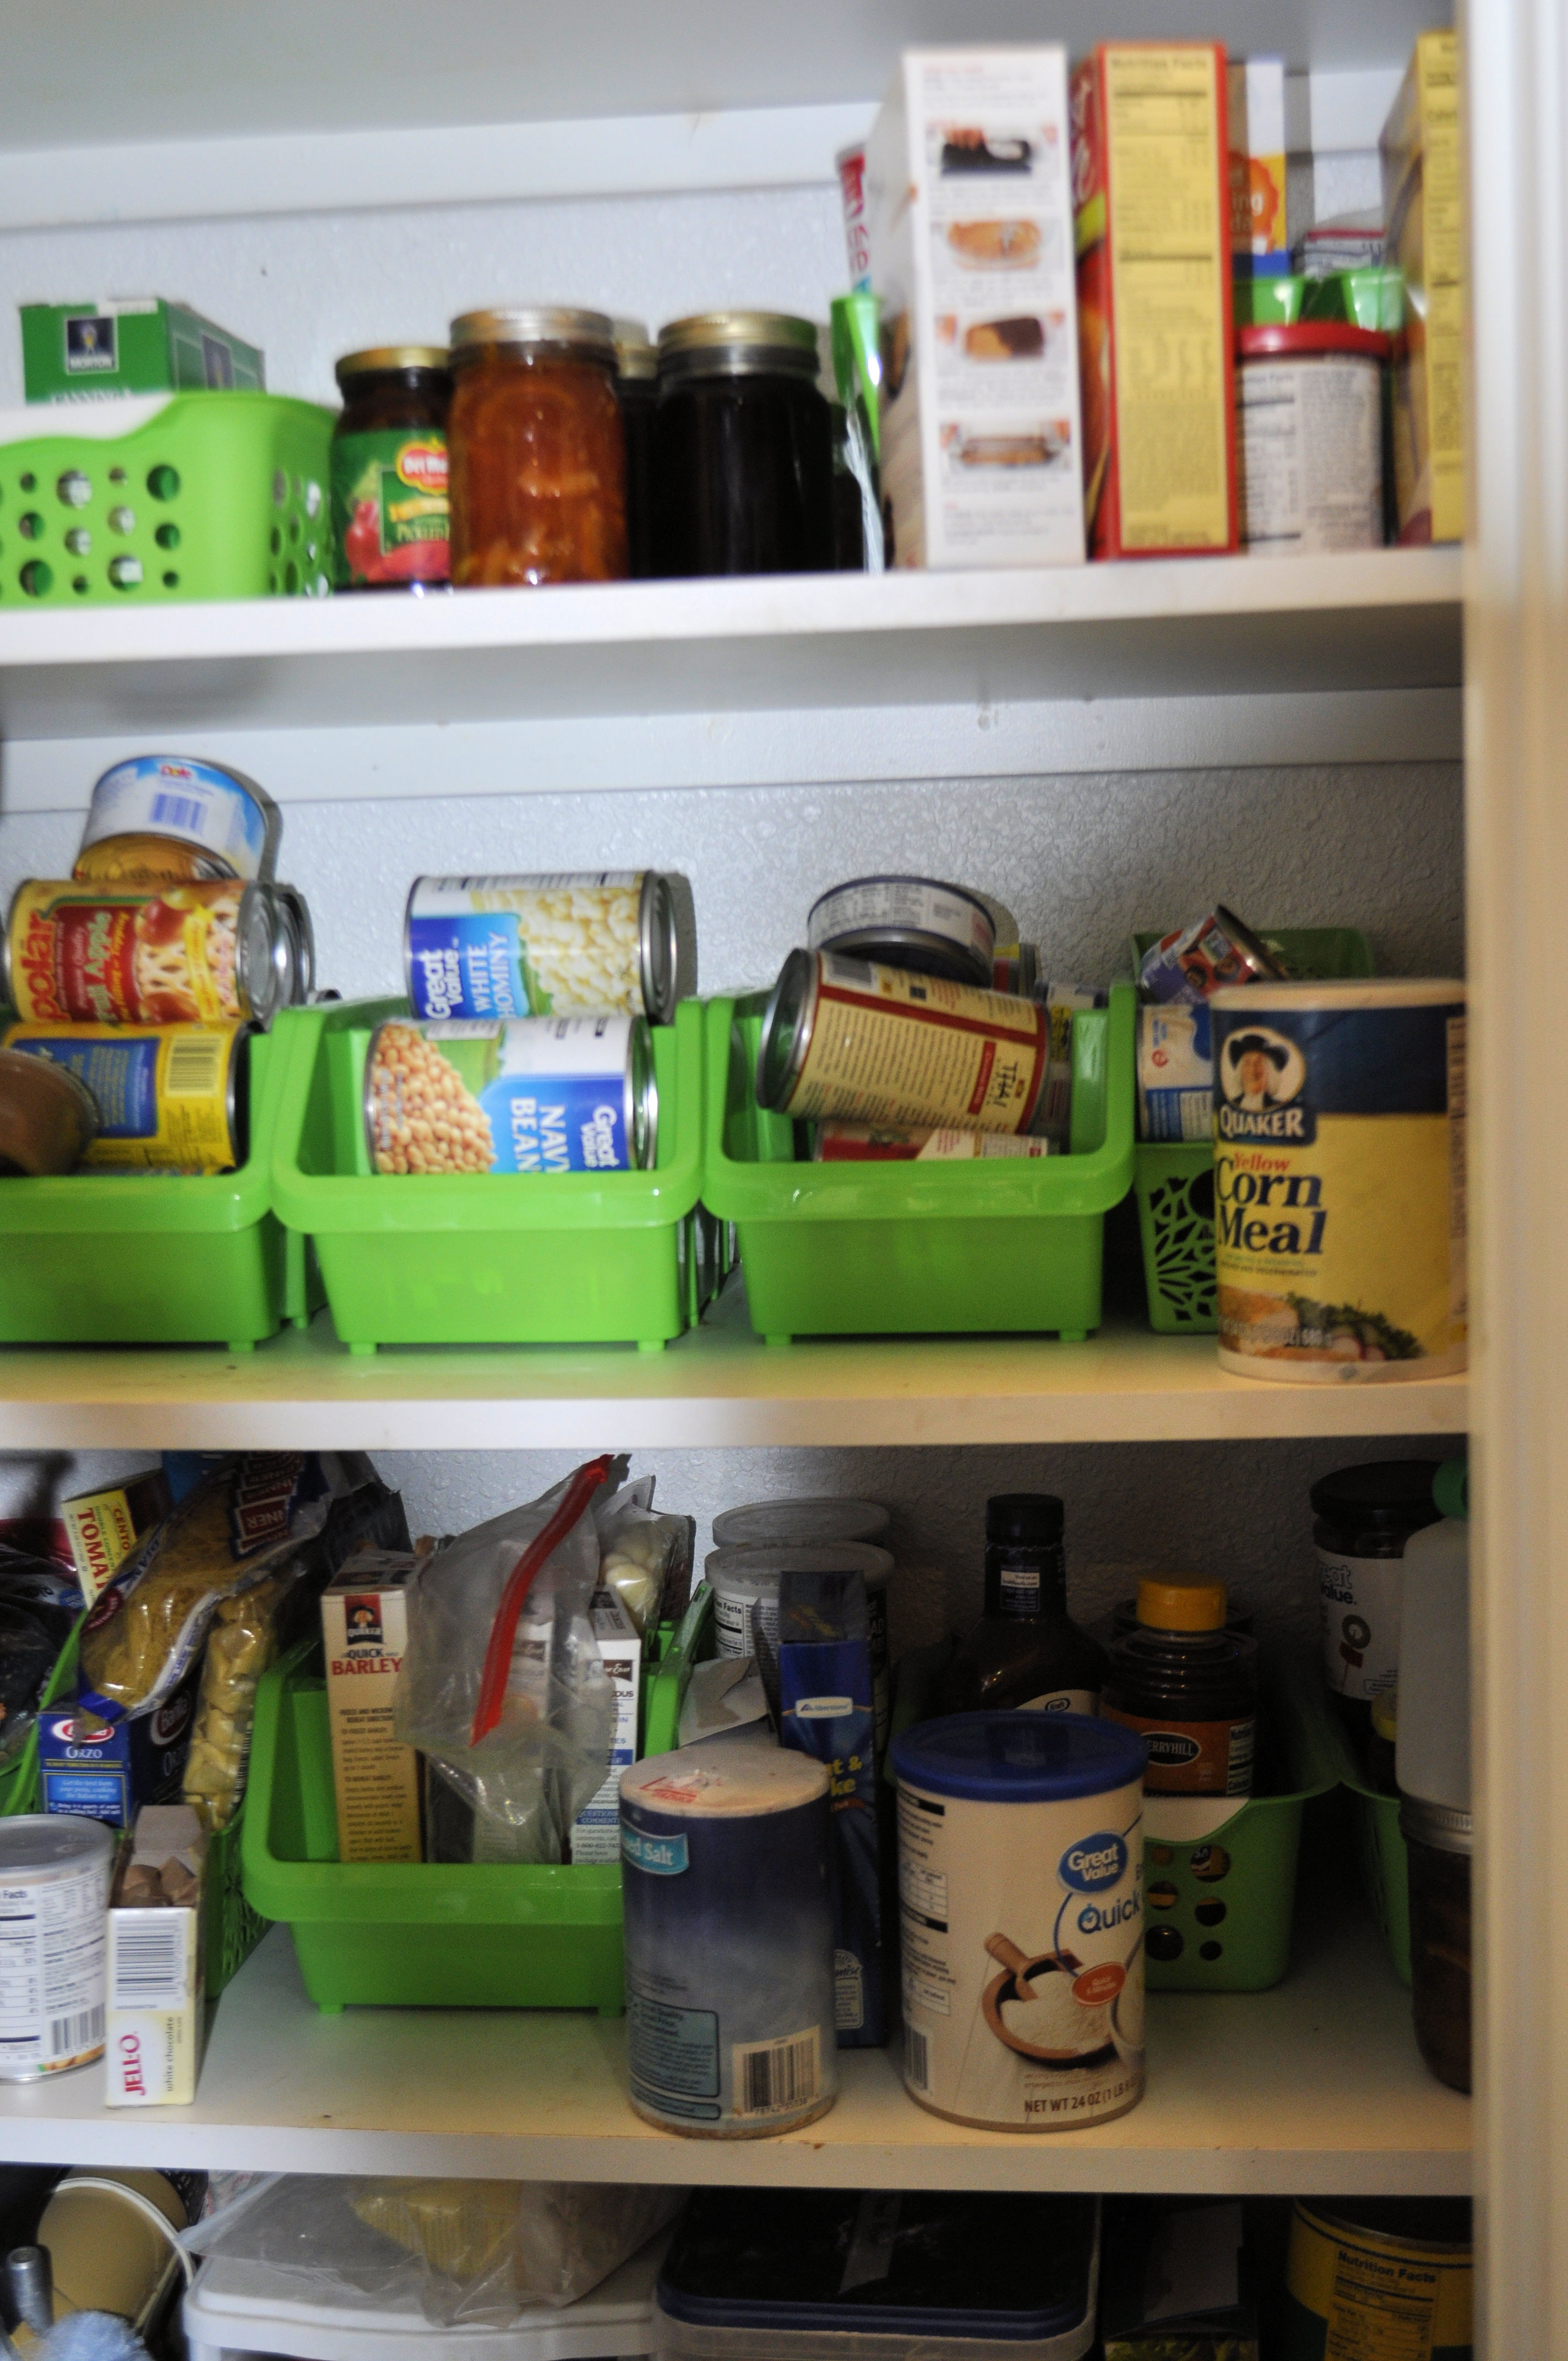
Well, in keeping with the spirit of Spring, I decided it was long past time to tackle the chaos in my pantry. As you can see from this photo, I’ve managed to ignore this chore for too many Springs. No longer. This year is it.

First thing was to take a trip to the dollar store. There is always an interesting array of baskets and bins that are ideal for organizing untamed stuff. I picked up a dozen assorted items in a lovely lime green and brought them home with pride in accomplishing this much. Secretly, I hoped the elves would come at night and finish the job. They didn’t.

Armed with my new bins and baskets, I faced the pantry and froze. Where do I start? I just didn’t know. There was just too much stuff. I needed an answer for the miscellaneous small items that jammed the shelves, most of which were spices and seasonings. My spice and seasoning organizer was already full and the overflow had no where to go.

The next thing I did was hit the Internet for an over-the-door shelf unit to store those small items. Once that came, I could revisit the pantry. I took out all the loose, small items that were cluttering the shelves and put them on the door unit. Eureka! I Created space. From there, I could move forward.

The next items I addressed were the canned goods. They were sorted into usable categories and stacked into bins. More space freed. Baking supplies were the next to succumb. A basket corralled powders and extracts nicely. Dry beans found a home. Pasta had a place. Things were really coming together.

As things were sorted, I found things that had been pushed to the back and lost for some time. Four packages of dried chilies surfaced from the depths. Only one was opened. Apparently, I couldn’t find them so I bought more. Not a very frugal thing to do.Dried Chili Peppers

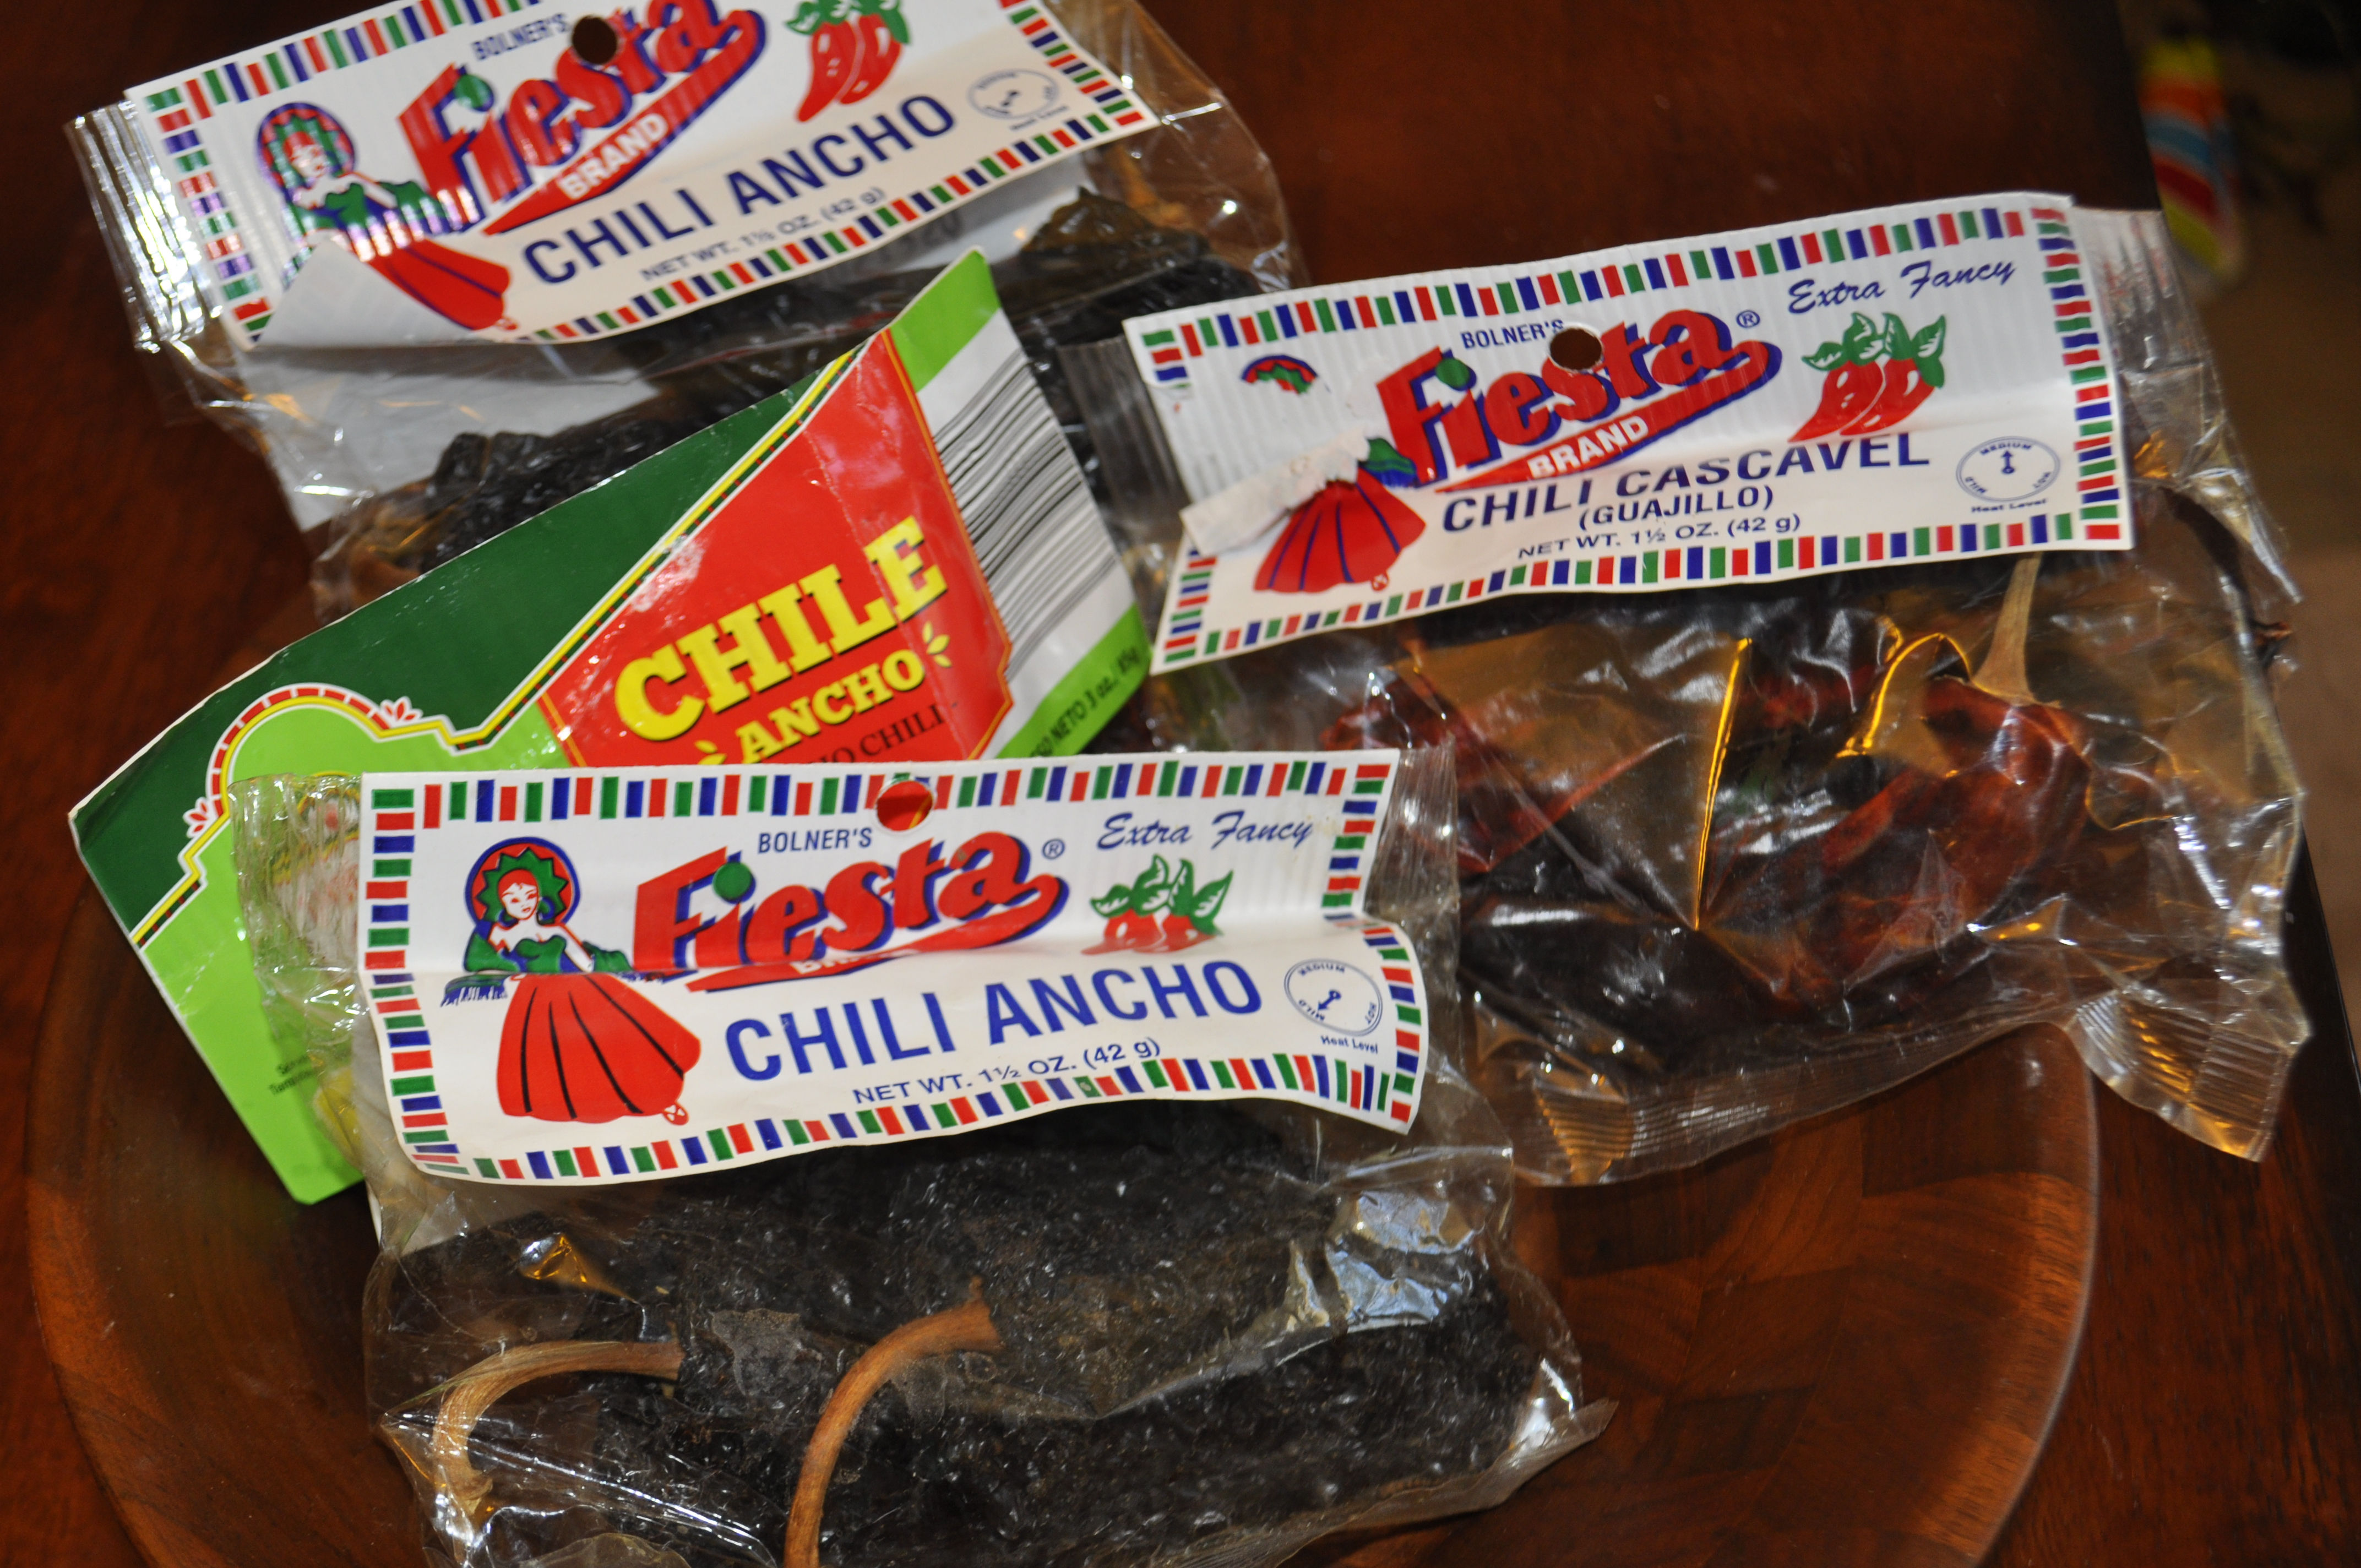
I took some of those chilies and made some great enchilada sauce with them. I adapted a recipe from A Dish of Daily Life.

Enchilada Sauce


2 tablespoons vegetable oil
1/2 cup diced onion
1/2 cup chopped carrots
1 garlic clove, minced
2 tablespoons flour
4 dried Ancho chilies
2 1/2 cups water
1 teaspoon Mexican oregano
1 teaspoon ground cumin
Salt to taste

Chop the dried chilies into small pieces. (The food processor works well for this.) Set aside
Heat oil in a medium saucepan. Add carrots, onions, and garlic. Saute until soft. Stir in flour.
Add water slowly, stirring until well mixed. Add the chilies, oregano and cumin. Bring mixture to a boil. Reduce heat and simmer for 20 minutes.
Allow to cool. Puree the sauce in the food processor, a blender, or with an immersion blender until smooth. Season with salt.
May be frozen.

Pantry

My pantry isn’t completely finished but it is so much more workable now. I can find things and I’m working on using things I have on hand to further reduce the clutter. I’m feeling pretty proud of myself. I faced this challenge with only a little fear.

Fall’s First Chore

We started on the first of our fall chores this weekend by tackling the windows. (See Cleaning up for Fall) It’s truly a chore because you just can’t wash the windows. You have to move any furniture, plants, and all other things that are placed in front of the windows on the inside. The screens need to be removed, cleaned and repaired if necessary. After all that, you can wash the windows. Of course, they are two-sided so the work is doubled.

I saw this formula several months ago and vowed to try it whenever we got around to the windows. It’s promise was to lessen the work, which I’m all for, and it did. The water sheeted off the windows and didn’t require wiping or the use of a squeegee. It’s important to hose off the windows prior to cleaning to remove as much dust and dirt as possible. Once the solution gets dirty, it doesn’t rinse off as well and leaves the windows smeared.


window


Here is One Good Thing by Jillee’s original recipe. I made mine loosely based on this, but simplified it by adding 1/4 cup of everything to the 2 gallons of water. It worked. I’m sold.

Homemade Streak-Free Window Cleaner

1/2 bottle of Dishwasher Rinse Aid (the bottle I bought was just under 7 ounces so I measured out 3.5 ounces)
4 Tablespoons isopropyl alcohol (I used 70%)
1/4 cup ammonia
1 handful of powdered dishwasher detergent (which depending on the size of your hand could probably vary quite a bit! I used a “handful” which looked to me to be about 1/4 cup. Give or take.)
2 Gallons of hot water

Cleaning Up for Fall

I hope I’m not alone in this, but I don’t like housework. The only good chore is one that is done.

Getting things done isn’t that simple for me. It’s entirely too easy to be distracted from household tasks. I can start something and stop before I’m finished because something else is more interesting. Watching the grass grow or the paint dry is particularly alluring.

We associate Spring with cleaning. Why? My house needs cleaning more than once a year so I like to do a fall cleaning, too. It’s too warm in the house over the summer to do any heavy work, even with the AC on. I don’t turn the temp down enough to allow for deep cleaning because I don’t want a power bill the size of the mortgage. In the fall, it’s naturally a good temperature in the house for heavy work.

fall

So, let’s get started on a good Fall cleaning.

This site has a list of chores and blank check-lists to download

Orange Cleaner Revisited Again

orangecleaner

I reported some results from the one of the orange cleaners I made about four weeks ago in this post. The recipes for each cleaner are here. This time, I want to report on the fermented cleaner.

This cleaner I diluted 1:8 (1/4 cup solution in 2 cups water). This was the recommendation from one of the websites I looked at for information.

In a side-by-side test, I think the first cleaner won. It’s not that this one didn’t clean things. It did. Both cleaned, but the vinegar seemed to cut through the gunk a micro-second faster. Maybe the solution was too dilute. Perhaps I should use the 1:1 that I did for the first cleaner to get a more accurate result.

I still stand by my story: there isn’t much difference in the results between the 2 solutions.

Orange Cleaners Revisited

A little over three weeks ago, I started making orange cleaners. I did two types and you can find the recipes here. They are done, and now it’s time to test them. OK, I admit to procrastinating on this. These things were actually done after two weeks. I guess I’m just not in a hurry to clean.

orangecleaner

I used the vinegar-based cleaner first. I diluted it 1:1 with water and put it into a spray bottle. Next I tried it out on a few surfaces, which included the inside of the microwave, the glass door on the toaster over, a section of granite counter-top, and the glass-top range. It worked well but it wasn’t miraculous. I didn’t expect it to be really, but it did do what cleaners are supposed to do: it cleaned. The spatters inside the microwave wiped off easily, the counter-top shines, and even the glass looks good without streaks. The things I cleaned with it are clean! Isn’t that the goal?

It does smell better than plain vinegar, so that’s a bonus in itself. I know what’s in it. That’s a huge benefit. It works pretty well. That’s the goal.

Overall, this orange cleaner can find a place in my cleaning routine.

Little Steps, Big Changes

Starting something new is overwhelming. Have you ever tried to read something that is a new subject and it seemed like it was written in Klingon? Only through systematic chipping, taking small bites, can you finally unravel the mystery.

Developing a new lifestyle is the same process. Take small steps and soon you’re changes are habit and not torture.

It’s fun to read how people live frugally. Some of their ideas are workable and will fit into my life easily. Some are a bit out there, to be kind. I draw the line at eliminating toilet paper from our home. The work involved in washing and drying doesn’t outweigh the convenience of TP. There’s also the yuck factor. Just not gonna do it.

toilet-paper-150912_1280
I’ve been in a financially tough time when paper towels were a luxury and not a part of my kitchen supplies. I could go back to that again, but I haven’t. I guess times just aren’t tough enough right now.

There are things that I do now which make me wonder why I didn’t do them all along. I spent some time yesterday making jam. My husband spent part of his day making jerky. (He makes it because he eats it. I don’t) Am I saving a bunch making my own jam? Not really, because I buy the fruit. If I could go out a pick fruit to use, then the savings would be obvious. The jerky, on the other hand, is a fraction of the price of anything we can buy.

Jars of Jam
The benefit of making things at home is that I know what’s in it. I don’t use anything I can’t pronounce. To me, that’s a big benefit. The other, especially with jam, is the reduction in waste. I reuse the jars. An empty jar from the store isn’t reusable, usually.

These are just two small steps in my overall frugal-living plan. I’ve already posted some of the recipes I use to make staples and cleaning supplies.

DIY Laundry Detergent
The Dreaded Dusting Chore
The Baking Mix Scoop
No, Really? No Poo
DIY Liquid Hand Soap
DIY Yogurt
DIY Disinfecting Wipes
5 Favorite From Scratch Recipes
Orange is the New Clean

There are dozens more that I haven’t yet tried. I’ve also abandoned some things that I tried and found they didn’t work well for me. One was my own dishwasher soap. I’ve tried a couple of formulas and I felt they didn’t do the job that a commercial product does, so I no longer make my own soap. Frugal living is not only a step-by-step process, it’s a trial and error one, too.

It’s all about the little efforts and you don’t have to learn Klingon.

Orange is the New Clean

oranges

I ran across these recipes months ago and I started saving citrus peels. They languished in the freezer until I had the containers to make the mixes. Now, it’s a go. Confession time: I didn’t have any brown sugar, so I used regular, white sugar instead. I’m pretty sure that it will make no difference in the fermentation process.

Here are the two formulas that I’m trying. Since they take 2 weeks or more to complete, I’ll let you know my results later.

orangepeels

All_Purpose Citrus Cleaner

1-2 quart jar
White vinegar
Citrus peels, chopped (orange, lemon, lime, grapefruit or a combination)

Place citrus peels into jar until it is, at least, half full.
Fill jar with vinegar.
Cover jar tightly and shake.
Steep for 2 weeks, shaking occasionally. Label the jar so that you can keep track.
Strain liquid through a fine sieve. Discard the peels.
Pour into a spray bottle and dilute 1:1, if desired.
Use on sinks, counter tops, bathtubs, floors, and toilets.

citrus-2791_1280

DIY Citrus Cleaner

2 liter bottle
1/2 cup brown sugar
1 tsp yeast
Citrus peels (at lest 2 cups, chopped)
32 ounce spray bottle

Drop citrus peels into the bottle.
Add yeast and sugar.
Fill about half full with water. Shake bottle to dissolve sugar. (About 30 seconds)
Cap loosely to allow gases to escape.
Label bottle with date and allow to “brew” for about 2 weeks, shaking at least daily.
When the cleaner is ready, strain through a fine sieve. Discard peels.
Add 1/2 cup to spray bottle and fill with water for regular cleaning.

orangecleaner

Why, Of Course! DIY Disinfecting Wipes

Does anyone like cleaning the bathroom? We all know that doing a little each day makes the chore easier especially if there is a quick and easy way to do it. Disinfectant wipes are convenient, easy to use, but expensive. Naturally, DIY wipes are the way to go

I searched the Internet for what others were doing for homemade wipes. I found a lot of formulas. The assorted ingredients included vinegar, coconut oil, a multitude of essential oils, and pine cleaner.

Many years ago, in a Microbiology class in college, we tested some common household items for their germ-killing capabilities. A petri dish was prepared with three different bacteria. (I don’t remember what they were.) We all brought in different things to try. My lab partner brought Woolite. I brought pine cleaner. Two out the three areas on her dish were clear of bacteria after applying her Woolite. My pine cleaner killed NONE of the bacteria. So, it may not come as any surprise that I don’t use pine cleaner.

Knowing what I do about pine cleaner, I skipped any formulas that called for it. I wanted a disinfecting wipe and I have scientific evidence that this stuff wouldn’t disinfect its way out of a paper bag.

tshirt

The cloth to use for the wipes is a no-brainer. I’ve got several old T-shirts with stains that nothing on the planet will remove. They remain in the drawer until I make cleaning rags out of them. It was time to press one of those shirts into service.

Some folks used paper towels. Not only did they suggest using paper towels, they suggested sawing the roll in half. No. Not doing that.

So, in my search for a recipe, I landed on the Living on a Dime site. Unlike many of the other recipes, this one includes alcohol. It’s one thing that we know will disinfect; the jury is still out on many of the others.

WipesIngredients

Homemade Disinfecting Wipes

1 cup water
1/4 cup rubbing alcohol
2 tablespoons Dawn dish soap
2 tablespoons ammonia (optional)

Mix the ingredients together. Pour over rags until sufficiently dampened.

DIY Liquid Hand Soap

handsoap2

I thought I had a big bottle of liquid soap to refill my dispensers. I knew just where it was, only it wasn’t there. Its location remains a mystery.

So, rather than buy another bottle, I decided to make some liquid soap. It really couldn’t be easier.

Liquid Hand Soap

4 ounces bar soap, grated
8 cups distilled water
1 tablespoon glycerin

Bring water to boil in a large, non-reactive pan. Remove from heat and add grated soap. Stir until soap is dissolved. Allow to cool for several hours or over-night. The mixture will have the consistency of slime.
When completely cool, mix in glycerin. Using an electric mixer makes this easier. Pour into pump dispensers.

Makes 1/2 gallon.

Next time, I’ll add a little fragrance into the mix. The scent from the bar soap is still discernible but it is diluted. Though, with 1/2 gallon on hand, it may be some time before I need to make any more.

No, Really? No Poo

Homemade products can be described in many ways:

Wishful thinking
Suitable or adequate
Cheaper in most circumstances
Controllable
Able to address specific problems

I can’t believe this one worked! On January 7, 2015, I washed my hair with baking soda, rinsed with diluted vinegar, and my hair felt great. I was totally amazed. My hair was squeaky clean and, after using the diluted vinegar rinse, not difficult to comb out. I wonder how much shampoo and conditioner I’ve used over the decades. It’s not something I tracked. I just always had shampoo to use, and when the bottle was empty, I bought more without question. It’s just what we do.

There are detractors online who predict dire outcomes from using baking soda, an alkaline product, on your hair. Everything from dry hair to hair loss is covered. What I found, though, is that the people writing posts like this always had a “natural” alternative to shampoo that was promoted, so no one would do the unthinkable and use baking soda. Hmmmm

I don’t disagree that baking soda is alkaline. It is. I do disagree about the damage it will cause with use. Maybe it’s long-term use that causes all that chaos but so far, I have not seen any adverse affects. I was seeing quite a bit of drying with the last shampoo I was using-the one that claimed on the label that it would do just the opposite of that. Even with a conditioner, the ends of my hair were starting to resemble straw.

Use caution. Baking soda can be harsh. After a stab at making deodorant, I found I am a bit sensitive to baking soda. My underarms were red and itchy after using the DIY deodorant. Once I stopped, all problems cleared up quickly. I haven’t done it yet, but I intend to try homemade deodorant again using less or no baking soda. Stay tuned.

The same sensitivity occurred on my scalp. After washing my hair with baking soda, I had a bit of itchiness. So, what did I do? I made sure to get some of the diluted vinegar on my scalp as well as my hair. Problem solved. No more itch.

nopoo

There are, of course, many posts online singing baking soda’s praises as a shampoo. The mixes range from a mild solution to those that call for making a paste of the baking soda with just a bit of water. The first one I found used 1 tablespoon of baking soda in 1 cup of water. This works for my hair. The cost of this is so small, that I really didn’t bother to figure it out.

The vinegar rinse is much the same. I use 1 tablespoon of vinegar to 1 cup of water. After you rinse your hair, no vinegar smell will remain.

The bottom line on this is that you may have to experiment with your own hair to see what works. It may not work for you and, like some DIY products, this method may only be wishful thinking.